Pocket Door Installation: A Comprehensive Guide
Pocket doors offer space-saving elegance‚ sliding into wall cavities‚ ideal for modernizing interiors and tight spaces like bathrooms and halls.
Installation‚ like Rocket Pocket Door systems‚ can be surprisingly straightforward‚ often requiring no specialized tools for a clean‚ efficient result.
Understanding Pocket Doors & Their Benefits
Pocket doors represent a sophisticated alternative to traditional swinging doors‚ offering a unique blend of functionality and aesthetic appeal. Unlike conventional doors that require ample swing space‚ pocket doors elegantly slide into a concealed cavity within the wall‚ maximizing usable floor area – a crucial advantage‚ particularly in smaller homes or apartments.
This space-saving characteristic makes them exceptionally well-suited for areas like bathrooms‚ hallways‚ and closets where every inch counts. Beyond practicality‚ pocket doors contribute to a cleaner‚ more streamlined interior design‚ fostering a sense of openness and modernity. They eliminate visual obstructions created by swinging doors‚ enhancing the flow between rooms.
Furthermore‚ the installation process‚ as demonstrated by systems like Rocket Pocket Door‚ is often surprisingly simple‚ frequently requiring only basic tools; Homeowners are increasingly choosing pocket doors not just for their space-saving benefits‚ but also for their ability to modernize interiors and create a more accessible living environment.
Space Saving Advantages of Pocket Doors
Pocket doors fundamentally redefine space utilization within a home. Their defining characteristic – sliding directly into the wall – eliminates the arc of space required by swinging doors‚ a significant benefit in compact living areas. This is particularly valuable in hallways‚ bathrooms‚ and smaller bedrooms where floor space is at a premium.
By removing the need for a clear swing path‚ pocket doors unlock valuable square footage‚ allowing for more flexible furniture arrangements and improved accessibility. This advantage extends beyond simply freeing up floor space; it also contributes to a less cluttered and more open feel within the room. The streamlined design promotes a sense of spaciousness‚ even in smaller environments.
Systems like the Rocket Pocket Door further enhance this benefit with simplified installation processes‚ minimizing disruption during the upgrade. Choosing a pocket door isn’t just about saving space; it’s about optimizing the functionality and aesthetic appeal of your home.
Pocket Door vs. Traditional Swinging Doors
Traditional swinging doors‚ while commonplace‚ demand a dedicated swing radius‚ potentially obstructing walkways and limiting furniture placement. Pocket doors‚ conversely‚ slide seamlessly into the wall‚ negating this requirement and maximizing usable floor space – a crucial distinction for smaller homes or areas needing accessibility improvements.
Aesthetically‚ pocket doors offer a more modern and streamlined appearance‚ contributing to a cleaner interior design. They can visually “disappear” when open‚ creating a more open and connected feel between rooms. Swinging doors‚ while offering a traditional charm‚ can sometimes feel visually intrusive.
Installation complexity differs; while standard doors are relatively straightforward‚ pocket door installation involves framing a cavity within the wall. However‚ systems like Rocket Pocket Door aim to simplify this process‚ requiring fewer specialized tools. Ultimately‚ the choice depends on space constraints‚ aesthetic preferences‚ and desired functionality.

Planning Your Pocket Door Installation
Careful planning is key! Consider wall framing‚ door size‚ and the chosen pocket door kit. Accurate measurements and proper preparation ensure a smooth‚ successful installation process.
Measuring for a Pocket Door System
Accurate measurements are absolutely critical for a successful pocket door installation. Begin by determining the desired door width; standard sizes are available‚ but custom options exist. Measure the rough opening – the framed space where the door will reside – carefully‚ noting both width and height.
Crucially‚ assess the depth available within the wall cavity. Pocket door kits require a specific depth to fully recess the door. Confirm sufficient space exists before purchasing a system. Also‚ measure the wall thickness to ensure compatibility with the chosen kit’s framing requirements.

Don’t forget to account for the door’s thickness when calculating the required rough opening dimensions. Precise measurements prevent frustrating issues during installation‚ like a door that doesn’t fit or a track that’s too short. Double-check all figures before proceeding to the next step. A detailed sketch‚ including all measurements‚ is highly recommended for clarity.

Choosing the Right Pocket Door Kit
Selecting the appropriate pocket door kit is paramount for a smooth installation and lasting performance. Consider the door’s weight capacity; heavier doors require more robust systems. Kits vary in quality and features‚ so research different brands like Rocket Pocket Door‚ known for simplified installation processes requiring minimal specialized tools.
Determine if the kit includes all necessary hardware – track‚ rollers‚ jambs‚ and fasteners. Some kits assume you’ll reuse existing jambs‚ while others provide complete replacements. Assess your wall construction; some kits are better suited for standard stud spacing than others.
Think about the door style you prefer – single or double doors‚ primed or pre-finished. Read reviews and compare specifications to ensure the kit meets your needs and skill level. A well-chosen kit streamlines the installation‚ minimizing complications and maximizing the final result’s aesthetic appeal and functionality.
Framing Considerations & Wall Preparation
Proper framing is crucial for a successful pocket door installation. You’ll need to create a framed cavity within the wall to house the door when it’s open. This requires accurately measuring and installing studs to the correct dimensions‚ ensuring they are plumb and square. Existing wall framing may need modification or reinforcement to support the pocket door system’s weight and prevent future issues.
Carefully plan the cavity’s depth‚ accounting for the door’s thickness and the track’s dimensions. Ensure sufficient space for the door to slide freely without obstruction. Wall preparation involves removing any existing trim‚ drywall‚ or obstructions within the framing area. Inspect the wall for electrical wiring or plumbing‚ rerouting if necessary before commencing framing work.
A solid‚ well-prepared frame guarantees smooth operation and prevents the door from binding or becoming misaligned. Precise measurements and careful execution are key to a professional-looking and functional installation.

Tools and Materials Needed
Essential tools include a level‚ measuring tape‚ saw‚ drill‚ and screwdriver. Required materials encompass the door itself‚ the pocket door track system‚ and all necessary mounting hardware for a secure fit.
Essential Tools for Pocket Door Installation
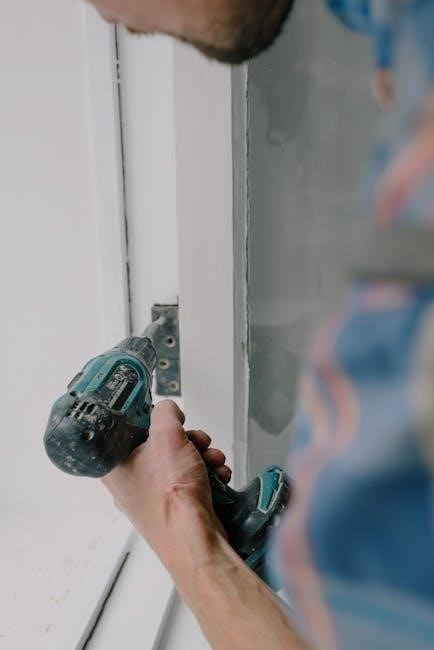
Successfully installing a pocket door demands a carefully curated toolkit. A high-quality measuring tape is paramount for accurate cavity and door sizing‚ ensuring a smooth glide. A stud finder is crucial for locating wall studs to securely mount the track and framing. You’ll need a level – both a spirit level and potentially a laser level – to guarantee the track is perfectly horizontal‚ preventing door binding.
Cutting tools are essential; a circular saw or hand saw will be needed for framing adjustments. A drill‚ equipped with various drill bits‚ is vital for pilot holes and screw driving. A screwdriver set‚ including both Phillips head and flathead‚ is necessary for securing hardware. Don’t forget safety glasses to protect your eyes from debris!
Additional helpful tools include a hammer‚ utility knife for trimming‚ and potentially a jamb saw for precise cuts. For fine adjustments‚ a shim set can be invaluable. While some systems‚ like Rocket Pocket Doors‚ boast tool-less installation‚ having these tools on hand ensures a professional and efficient outcome.

Required Materials: Door‚ Track‚ Hardware
Beyond the tools‚ assembling the necessary materials is key to a successful pocket door installation. Obviously‚ you’ll need the door itself – pre-hung options simplify the process‚ but a slab door offers customization. A pocket door track kit is fundamental‚ encompassing the track‚ rollers‚ and often‚ basic mounting hardware. Ensure the kit is appropriately sized for your chosen door.
Essential hardware includes screws of various lengths for framing and hardware attachment‚ shims for fine adjustments‚ and potentially wood glue for added stability. Door stops are crucial to prevent the door from sliding too far into the cavity. Consider purchasing a latch and strike plate compatible with pocket doors.
Depending on your aesthetic‚ you’ll also require door trim and casing to finish the installation. Finally‚ don’t overlook the importance of drywall and joint compound for patching the wall cavity after framing. Selecting quality materials ensures longevity and a professional finish‚ mirroring the simplicity of systems like Rocket Pocket Doors.
Step-by-Step Installation Process
Begin by carefully framing the wall cavity‚ then install the pocket door track‚ ensuring it’s level and secure. Finally‚ hang the door and meticulously adjust alignment for smooth operation.
Framing the Pocket Door Cavity
Creating the pocket for your door requires precise framing. Start by marking the wall for the door’s opening‚ ensuring it’s slightly wider than the door itself to accommodate the track. Construct the header‚ side jambs‚ and sill using appropriately sized lumber – typically 2x4s or 2x6s‚ depending on load-bearing requirements and local building codes.
The cavity depth must match the door’s thickness plus the track’s depth. Securely attach the framing members to the existing wall studs‚ using screws or nails. Reinforce the header to support the weight of the door and the surrounding drywall.
Pay close attention to plumb and level throughout the framing process; a misaligned frame will cause operational issues. Ensure the cavity is square to allow for smooth door movement. Finally‚ add blocking within the cavity to provide support for the track and prevent warping. This meticulous preparation is crucial for a successful installation.
Installing the Pocket Door Track
With the cavity framed‚ the track installation begins. Carefully position the pocket door track within the framed opening‚ ensuring it’s level and securely fastened to the header and side jambs. Most systems‚ like Rocket Pocket Door‚ are designed for easy installation without specialized tools‚ utilizing screws for attachment.
Follow the manufacturer’s instructions precisely‚ as track placement is critical for smooth door operation. Verify the track is flush with the finished wall surface to allow for proper door alignment. Some tracks require shimming to achieve perfect levelness.
Install any rollers or guides specified by the kit‚ ensuring they are properly aligned with the track. Double-check all connections for tightness and stability. A correctly installed track forms the foundation for effortless sliding and long-term reliability of your pocket door system.
Hanging the Door and Adjusting Alignment
Carefully lift the door and align the rollers with the installed track. Gently guide the door into the cavity‚ ensuring the rollers seat properly within the track’s channels. This step often requires a slight upward tilt of the door to engage the rollers.
Once inside‚ test the door’s movement. It should slide smoothly and freely along the track. If resistance is encountered‚ re-examine the track installation and roller alignment. Many pocket door systems offer adjustable rollers‚ allowing for fine-tuning of the door’s height and alignment.
Adjust the door’s position until it’s level and closes flush against the jamb. Secure any locking mechanisms or stops provided with the kit. Precise alignment is crucial for preventing binding and ensuring quiet‚ reliable operation. A well-hung door is the hallmark of a successful pocket door installation.
Finishing Touches & Troubleshooting
Final steps involve installing trim and casing for a polished look. Address common issues like binding with alignment adjustments‚ ensuring smooth operation and long-lasting enjoyment.
Installing Door Trim and Casing
Completing the aesthetic of your newly installed pocket door requires careful attention to trim and casing installation. Begin by measuring and cutting the casing pieces to fit snugly around the door frame‚ ensuring accurate miters for a professional finish.

Apply wood glue to the back of the casing and secure it to the frame using finishing nails. Countersink the nails and fill the holes with wood putty for a seamless appearance. Repeat this process for all sides of the door frame.
Next‚ install the door stop molding‚ which prevents the door from sliding too far into the wall cavity. This molding should be installed flush with the edge of the door opening. Finally‚ caulk any gaps between the trim and the wall to create a weather-tight seal and enhance the overall look. A properly finished trim and casing not only improves the door’s appearance but also contributes to its smooth and quiet operation.
Common Installation Issues & Solutions
Even with careful planning‚ pocket door installations can present challenges. A frequent issue is the door binding or sticking within the track; this often stems from improper track alignment or a warped door. Ensure the track is perfectly level and plumb‚ and consider planing down a warped door for a smoother glide.
Another common problem is insufficient framing‚ leading to a flimsy door opening. Reinforce the framing with additional studs if necessary‚ ensuring it’s robust enough to support the door’s weight. Rattling doors can be addressed by adjusting the door’s alignment within the track or adding cushioning material to minimize movement.
Finally‚ gaps between the door and the frame can be resolved with careful trim adjustments and caulking. Remember to consult the pocket door kit’s instructions for specific troubleshooting guidance‚ as systems vary. Addressing these issues promptly ensures a functional and aesthetically pleasing result.
Pocket Door Maintenance and Care
Maintaining a pocket door is relatively simple‚ ensuring years of smooth operation. Regularly vacuum the track to remove dust and debris‚ preventing binding and ensuring effortless gliding. Periodically inspect the track for any signs of damage or misalignment‚ addressing issues promptly to avoid further complications.
Lubricate the track and rollers with a silicone-based spray‚ avoiding oil-based lubricants that can attract dust. Check the door’s alignment and adjust as needed‚ ensuring a snug fit within the frame. Avoid forcing the door if it encounters resistance‚ as this can damage the track or rollers.
For painted doors‚ touch up any chipped areas to prevent moisture damage. Proper care extends the lifespan of your pocket door‚ preserving its functionality and aesthetic appeal. Refer to your installation guide for specific care recommendations related to your chosen system.