Delta 4-in-1 Crib Instructions Manual: Overview
Delta’s comprehensive guide details assembly and conversion, ensuring safety and longevity. Adult assembly is required; retain instructions for future reference.
Watch video guides for style 7312, and contact 1-800-377-3777 Ext. for missing parts. This crib is GREENGUARD Gold certified.
Delta Children’s 4-in-1 Crib represents a versatile and long-lasting sleep solution for your child, designed to adapt through various developmental stages. This convertible crib seamlessly transitions from a safe and secure infant crib to a comfortable toddler bed, a playful daybed, and ultimately, a stylish full-size bed, offering exceptional value and eliminating the need for multiple furniture purchases.
Before beginning assembly, carefully review these instructions to ensure a smooth and safe process. Proper assembly is crucial for the crib’s stability and your child’s well-being. The crib is GREENGUARD Gold certified, signifying it meets stringent standards for low chemical emissions. Utilize the provided parts list to verify all components are present. Should any parts be missing or damaged, immediately contact Delta Consumer Care at 1-800-377-3777 Ext. for assistance.
Consider utilizing the available online resources and video guides, particularly style number 7312, to supplement these written instructions.
Safety Precautions
Important: Strict adherence to these safety precautions is paramount to prevent serious injury or even death. Never modify the crib in any way, as alterations can compromise its structural integrity. Always follow the assembly instructions precisely; failure to do so may create hazardous conditions.
Do not place the crib near windows, radiators, or any potential hazards. Ensure all screws and bolts are tightened securely and checked regularly. Never use the crib if any parts are missing or damaged. A properly fitted mattress is essential – gaps between the mattress and crib sides pose a suffocation risk.
Adult assembly is absolutely required. Keep small parts and packaging away from children during assembly. Discontinue use if the crib shows signs of damage. Refer to the instruction manual for detailed guidance and contact Delta Consumer Care at 1-800-377-3777 Ext. with any concerns.
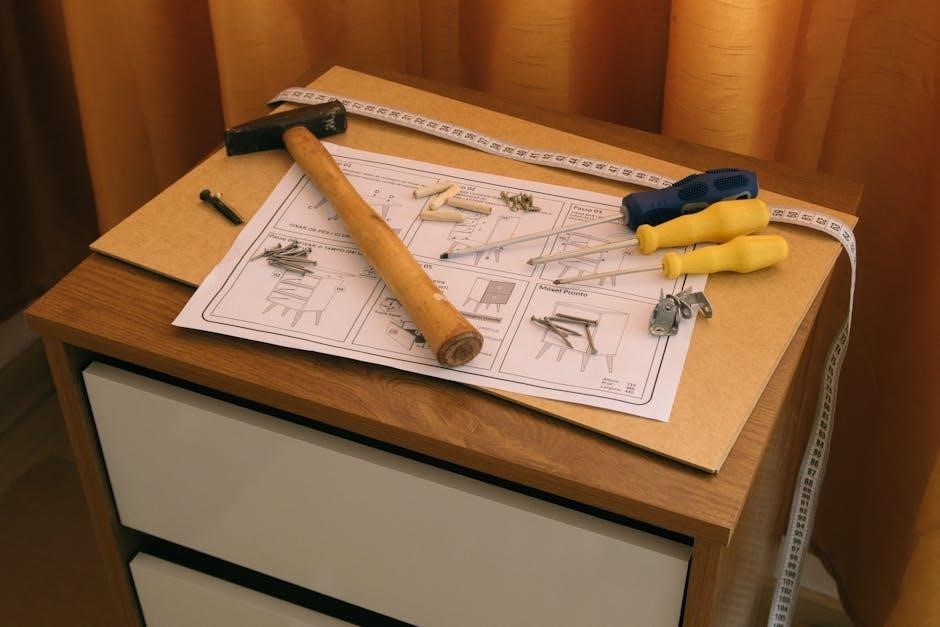
Tools Required for Assembly
Successful assembly of your Delta 4-in-1 Crib requires a few essential tools to ensure a secure and stable structure. A Phillips head screwdriver is absolutely necessary for tightening the majority of screws throughout the process. While not always mandatory, a power screwdriver with adjustable torque settings can significantly expedite assembly, but use caution to avoid over-tightening.
A rubber mallet may be helpful for gently tapping pieces together, particularly during the initial stages of frame construction. A level is crucial for ensuring the crib is perfectly balanced, preventing wobbling and enhancing safety.
Although typically included, having a spare Allen wrench set on hand can be beneficial for certain bolt adjustments. Always refer to the instruction manual for specific tool recommendations related to your crib model. Contact Delta Consumer Care at 1-800-377-3777 Ext. if you encounter any tool-related difficulties.
Assembly Instructions: Crib Mode
Begin by carefully following the instruction manual, ensuring all parts are present. Securely connect sides, headboard, and footboard, then install the mattress support for a safe crib.
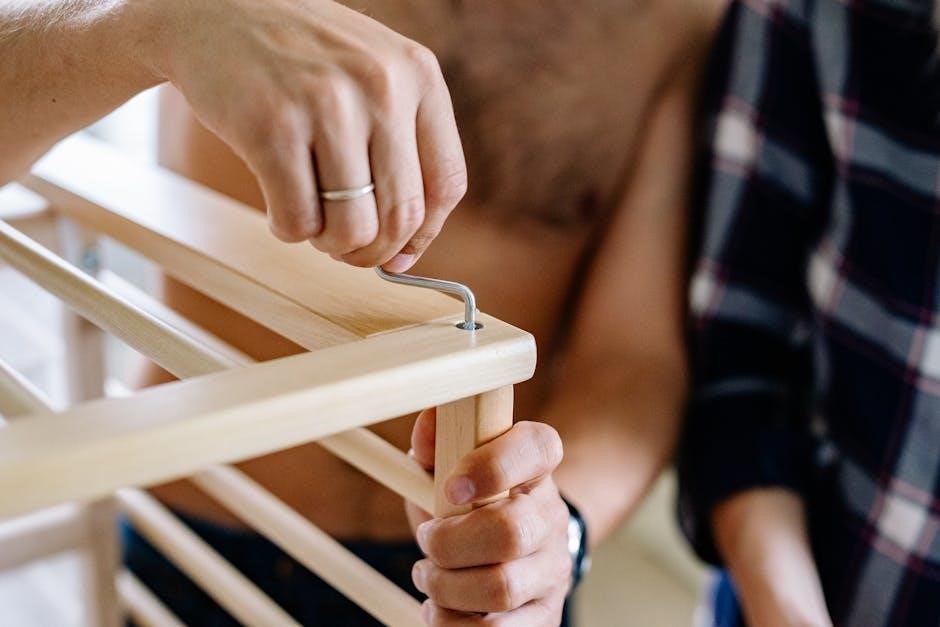
Step 1: Assembling the Crib Sides
Carefully unpack all components and verify against the parts list to ensure nothing is missing. Begin by laying out the two crib side panels on a protected surface to prevent scratching. Identify the pre-drilled holes – these will align for secure fastening.
Using the provided hardware (refer to the hardware identification section for correct screw types), attach the plastic inserts into the designated holes on the side panels. These inserts protect the wood and provide a more secure grip for the screws.
Next, connect the side panels to the headboard and footboard using the appropriate bolts and washers. Ensure the alignment is precise before fully tightening. Do not overtighten, as this could damage the wood. Double-check all connections for stability before proceeding to the next step. A properly assembled frame is crucial for the crib’s structural integrity and your child’s safety.
Step 2: Attaching the Headboard and Footboard
With the crib sides partially assembled, carefully position the headboard and footboard. Ensure the correct orientation – the headboard typically has a higher profile. Align the pre-drilled holes on the headboard and footboard with those on the crib side panels.
Using the designated bolts and washers (refer to the hardware identification guide), begin attaching the headboard and footboard. Hand-tighten the bolts initially to allow for adjustments. Once all bolts are in place, use the provided Allen wrench to securely tighten them.
Important: Do not fully tighten until you’ve confirmed proper alignment and squareness of the frame. A slightly misaligned frame can compromise stability. Double-check all connections, ensuring they are snug but not overtightened to prevent wood damage. A secure headboard and footboard are vital for the crib’s overall structural integrity;
Step 3: Installing the Mattress Support
With the crib frame securely assembled, it’s time to install the mattress support. Locate the mattress support hooks or brackets within the crib frame. These are designed to hold the mattress at the appropriate height.
Depending on the model, the mattress support may be adjustable, offering multiple height settings. Choose the initial height setting appropriate for a newborn – typically the highest position. Carefully insert the mattress support into the designated hooks or brackets, ensuring it sits level and securely.
Important: Verify that the mattress support is firmly in place before proceeding. A properly installed support is crucial for safe sleep. Regularly check the support’s stability as the child grows and adjusts the height accordingly. Always refer to the instruction manual for specific details regarding your crib model.
Step 4: Securing the Crib Frame

Once the headboard, footboard, and sides are connected, it’s vital to secure the entire crib frame. Locate the provided bolts, screws, and locking washers – refer to the hardware identification section of the instruction manual.
Carefully align the pre-drilled holes in the frame components. Insert the bolts or screws and tighten them using the appropriate tool. Ensure all fasteners are tightened securely, but avoid over-tightening, which could damage the wood. Double-check each connection point to confirm stability.

A securely fastened frame is paramount for the crib’s structural integrity and your child’s safety. Regularly inspect all hardware and re-tighten as needed. Failure to properly secure the frame could result in instability and potential injury;

Conversion to Toddler Bed
Transitioning to toddler mode involves removing crib sides and installing a dedicated toddler guardrail for safety. Adjust the mattress position accordingly.
Step 5: Removing Crib Sides for Toddler Bed
Carefully disassemble the crib to initiate the conversion to toddler bed mode. Begin by removing both crib side rails. Consult the assembly instructions to identify the specific hardware used to secure these rails – typically bolts or screws. Ensure you have the correct tools readily available to avoid damaging the crib frame or hardware.
Detach the side rails by loosening and removing all connecting hardware. Support the side rail during removal to prevent it from falling and causing damage or injury. Store the removed hardware in a safe place, as it may be needed for future conversions back to the crib configuration. Double-check that all hardware is removed before proceeding to the next step. Remember to follow the instructions precisely for a secure and stable transition.
Important: Do not attempt to force any components apart; If you encounter resistance, re-examine the instructions and ensure you are using the correct procedure.
Step 6: Installing the Toddler Guardrail
Once the crib sides are removed, prepare for toddler bed conversion by installing the toddler guardrail. Locate the toddler guardrail and the corresponding hardware – typically bolts and washers – as outlined in the instructions. Position the guardrail along one side of the now-open crib frame, ensuring it aligns with the pre-drilled holes.
Attach the guardrail using the provided hardware, tightening the bolts securely but not excessively. Verify the guardrail is firmly attached and stable, as it’s crucial for preventing your toddler from falling out of bed. Double-check all connections to ensure they are tight and secure. Refer to the manual for specific torque recommendations if available.
Important: Ensure the guardrail is installed on the side of the bed furthest from any doorways or potential hazards. Regularly inspect the guardrail for looseness and re-tighten as needed.
Step 7: Mattress Adjustment for Toddler Mode
Transitioning to toddler mode necessitates adjusting the mattress height for safety and ease of access. Lower the mattress to the lowest possible position within the crib frame. This minimizes the risk of your toddler climbing or falling out of bed. Ensure the mattress support is securely adjusted to the new height setting.
Verify the mattress fits snugly within the crib frame, leaving no gaps where a child could become entrapped. Confirm the mattress is level and stable. Use a level to check for any unevenness and adjust the mattress support accordingly. A properly adjusted mattress is vital for a safe sleep environment.
Remember to always use a mattress designed for use with a toddler bed and that meets all safety standards. Regularly check the mattress position and support to maintain a secure setup.

Conversion to Daybed
Remove the toddler guardrail to configure the crib for daybed use. This creates an open space, ideal for lounging or reading, offering versatile functionality.
Step 8: Removing Toddler Guardrail
To transition your Delta 4-in-1 Crib into a daybed, the first crucial step involves carefully removing the toddler guardrail. Locate the hardware securing the guardrail to the crib frame – typically bolts or screws. Using the appropriate tool, gently loosen and detach this hardware, ensuring you keep all parts organized to prevent loss.
Once the hardware is removed, carefully lift the guardrail, maneuvering it to clear the crib’s side rails. It’s helpful to have a second person assist with this step, especially if the guardrail feels heavy or awkward to handle. Inspect the areas where the guardrail was attached for any remaining hardware or sharp edges. Ensure these are addressed for safety.
Properly store the guardrail and its hardware in a safe place for potential future re-installation if you decide to revert back to the toddler bed configuration. This completes the removal process, preparing the crib for its daybed transformation.
Step 9: Configuring for Daybed Use
With the toddler guardrail successfully removed, configuring your Delta 4-in-1 Crib for daybed use is straightforward. Ensure the crib is positioned on a level surface, away from windows and potential hazards. Carefully assess the crib frame to confirm all bolts and screws from the guardrail removal are fully detached and do not present any sharp edges.
The daybed configuration utilizes the existing crib frame without side rails, creating an open sleeping space. Double-check the stability of the crib; it should stand firmly without wobbling. It’s crucial to use a properly sized mattress that fits snugly within the crib frame, leaving no gaps to prevent entrapment.
Remember that a daybed configuration is best suited for older toddlers who have transitioned beyond the need for enclosed sides. Regularly inspect the daybed for any loose parts or potential safety concerns.

Conversion to Full-Size Bed
Transitioning to a full-size bed requires attaching rails and a center support for stability. Ensure proper hardware is used, following Delta’s detailed instructions carefully.
Step 10: Attaching the Full-Size Bed Rails
Begin by carefully positioning the full-size bed rails onto the existing crib frame. Ensure the rails are oriented correctly, with the designated mounting points aligned. Utilize the provided hardware – typically bolts and washers – to secure each rail firmly to the crib’s side panels.
Tighten the bolts gradually and evenly, avoiding over-tightening which could damage the wood. Double-check that all rails are flush against the frame and securely fastened. A wobbly connection indicates a need for re-tightening or hardware adjustment.
Refer to the Delta instruction manual for specific diagrams illustrating the correct rail placement and hardware usage. Proper attachment is crucial for the bed’s structural integrity and the safety of the user. Confirm stability before proceeding to the next step.
Step 11: Installing the Center Support
Crucially, the center support rail provides essential stability for the full-size bed configuration. Locate the designated slots or mounting points along the underside of the converted bed frame. Carefully position the center support rail within these points, ensuring it spans the entire length of the mattress area.
Secure the rail using the appropriate hardware – often screws or bolts – provided in the Delta kit. Tighten these fasteners firmly, but avoid over-tightening to prevent wood splitting. The center support must be level and firmly attached to prevent sagging or instability.
Consult the instruction manual diagrams for precise placement and hardware specifications. A properly installed center support is vital for safe and comfortable use of the full-size bed. Double-check all connections before proceeding.
Step 12: Mattress Support for Full-Size Bed
Transitioning to the full-size bed requires a robust mattress support system. Utilize the existing crib frame, now reinforced with the previously installed center support rail. Ensure the mattress foundation – typically wooden slats – are correctly positioned across the frame.
Distribute the slats evenly, maintaining consistent spacing to provide uniform support for the full-size mattress. Secure each slat to the frame using the designated hardware, typically screws or brackets. Verify that all slats are firmly attached and level, preventing any potential sagging or instability.
Refer to the Delta instruction manual for specific slat placement and hardware details. A properly supported mattress is paramount for safety and comfort. Regularly inspect the support system for any loose connections or damage.
Important Considerations
Prioritize mattress safety, hardware checks, and regular cleaning. Addressing common assembly issues promptly is crucial. Contact Delta Consumer Care with questions.
Mattress Selection and Safety
Selecting the right mattress is paramount for your baby’s safety within the Delta 4-in-1 Crib. Ensure the mattress fits snugly within the crib frame, leaving no gaps exceeding two fingers’ width to prevent entrapment hazards. A firm mattress is essential; soft mattresses increase the risk of suffocation.
Always use a mattress designed specifically for cribs, adhering to all safety standards. Regularly inspect the mattress for any signs of damage, wear, or loose components. Avoid using second-hand mattresses, as their history and safety are unknown.
Never place pillows, blankets, or bumper pads inside the crib with the baby, as these items pose suffocation risks. The mattress support must be securely installed and regularly checked for stability. Proper mattress selection and consistent safety checks are vital for a secure sleep environment.
Hardware Identification and Replacement
Accurate hardware identification is crucial during Delta 4-in-1 Crib assembly. The parts list included in your manual details each screw, bolt, and washer type. Carefully compare each component to the diagram before proceeding. If any hardware is missing or damaged, do not attempt to substitute with non-original parts.
Contact Delta Consumer Care at 1-800-377-3777 Ext. to request replacements. Providing the crib’s model number (e.g., 540310) will expedite the process. Using incorrect hardware can compromise the crib’s structural integrity and safety.
Keep a record of your replacement requests for future reference. Regularly inspect all hardware connections during maintenance to ensure they remain tight and secure. Prioritize using genuine Delta replacement parts to maintain the crib’s quality and safety standards.
Cleaning and Maintenance
Regular cleaning and maintenance are essential for preserving the Delta 4-in-1 Crib’s finish and ensuring a safe sleep environment. Use a mild soap and water solution with a soft cloth to wipe down all surfaces. Avoid abrasive cleaners, solvents, or harsh chemicals, as these can damage the finish.
Periodically inspect all hardware connections – screws, bolts, and joints – to ensure they remain tight. Tighten as needed. Check for any signs of wear or damage to the wood or metal components. Address any issues promptly to prevent further deterioration.
Do not use oil-based products, as they can create a slippery surface. Ensure the crib is completely dry before placing a mattress or bedding inside. Consistent care will extend the life of your Delta crib and maintain its safety features.
Troubleshooting Common Assembly Issues
Missing Parts: If components are missing, immediately contact Delta Consumer Care at 1-800-377-3777 Ext. to request replacements. Do not attempt to substitute parts.
Difficulty Aligning Holes: Loosen surrounding screws slightly to allow for adjustment. Ensure the correct orientation of parts, referencing the instruction manual carefully. Avoid forcing connections.
Wobbly Crib: Check that all screws are tightened securely. Uneven flooring can contribute to instability; use shims under the legs if necessary. Re-examine the frame assembly for proper alignment.
Stripped Screws: Do not overtighten screws. If a screw strips, contact Delta for a replacement. Attempting to repair stripped screws can compromise the crib’s structural integrity. Always follow the instructions exactly.

Delta Consumer Care Contact Information
For assistance with assembly, missing parts, or any concerns, reach out to Delta’s dedicated team at 1-800-377-3777 Ext..
Explore online resources and FAQs for quick solutions.
Phone Support: 1-800-377-3777 Ext.
Delta Children’s Products Corp. provides dedicated phone support to assist you throughout the assembly process of your 4-in-1 Crib. If you encounter any difficulties, have missing or damaged parts, or require clarification on the instructions, please do not hesitate to contact our Consumer Care Team.
Simply dial 1-800-377-3777 and request Extension assistance. Our knowledgeable representatives are available to guide you step-by-step, ensuring a safe and successful assembly. Please have your crib model number readily available when you call to expedite the support process. We are committed to providing excellent customer service and resolving any issues you may experience. Remember, proper assembly is crucial for your child’s safety, so don’t hesitate to reach out for help!
We strongly advise reviewing the instruction manual before calling, as many common questions are addressed within the documentation.
Online Resources and FAQs
Delta Children offers a wealth of online resources to support your 4-in-1 Crib assembly and usage. Visit our official website for downloadable instruction manuals, helpful video tutorials – particularly for style number 7312 – and frequently asked questions (FAQs). These resources are designed to address common concerns and provide clear guidance throughout the process.
The online FAQs cover topics ranging from parts identification and replacement to troubleshooting assembly issues. You can also find information regarding conversion options, such as transitioning from crib mode to toddler bed, daybed, or full-size bed configurations.
Explore the website for additional product details, including GREENGUARD Gold certification information. These digital resources are available 24/7, offering convenient access to support whenever you need it. Ensure a safe and secure assembly by utilizing these valuable online tools.
Warranty Information
Delta Children stands behind the quality and safety of its 4-in-1 Cribs. Our warranty covers manufacturing defects in materials and workmanship under normal use. The warranty period begins from the date of purchase and varies depending on the specific crib model; please retain your proof of purchase for verification.
This warranty does not cover damage resulting from misuse, improper assembly, normal wear and tear, or modifications to the product. It also excludes issues arising from failure to follow the instruction manual guidelines.
To initiate a warranty claim, please contact our Consumer Care Team at 1-800-377-3777 Ext. and be prepared to provide details about the issue, your purchase date, and product model number. We are committed to resolving your concerns promptly and efficiently, ensuring your satisfaction with your Delta product.
Greenguard Gold Certification Details
Delta Children is proud to offer cribs certified by GREENGUARD Gold, signifying a commitment to indoor air quality and your child’s well-being. This certification means the crib has undergone rigorous testing for over 360 volatile organic compounds (VOCs), including formaldehyde, ensuring emissions are within stringent limits.

GREENGUARD Gold certification is particularly important for nurseries and children’s rooms, where little ones spend significant time. It demonstrates that the crib contributes to a healthier indoor environment, minimizing potential exposure to harmful chemicals.
The Delta 4-in-1 Crib meets the GREENGUARD Gold standards, providing peace of mind for parents; You can find more information about GREENGUARD Certification and its benefits at greenguardbuildingscience.com. Choosing a GREENGUARD Gold certified product is a step towards a safer and healthier home for your family.